Skip to content

Google Analytics 4 (GA4) will soon become the standard analytics tool for Google as it closes the door on Universal Analytics (UA) in July 2023. GA4 comes with massive changes which we’ve summarized below.
|
Universal Analytics |
Google Analytics 4 |
|
|
Measuring models based on |
Sessions, pageviews |
Events, parameters |
|
Privacy |
Need to use IP anonymization feature |
Does not store IP addresses |
|
Reports |
Provides many predefined reports, limited multi-device, and cross-platform reporting |
Focuses on custom reports, user-centric reports, full multi-device, and cross-platform reporting |
|
Segments |
2 |
3 |
|
Hit limits |
10 million |
No limit |
|
New Metrics |
Engaged sessions, Average engagement time per session, Engagement rate with access to BigQuery (also remove Bounce rate) |
| Read more about Google Analytics 4 here.
As such, migrating over to it from UA is not as simple as pressing a button.
To help you get the most out of GA4 and utilize its new features in collecting website visitors’ journey data, we’ll take you through how to set up GA4 for your Shopify store.
How To Setup Google Analytics 4 For Your E-commerce Tracking Needs
Setup GA4 account
How to set up GA 4 if you don’t have an Analytics account
The first thing you’ll need to do is get your Analytics account set up for Google Analytics 4. If you don’t already have an Analytics account, just follow these steps:
- Log in to Google account
- In Admin, go to Account column and click Create account
- Account name = company name
- Configure data sharing settings
- Create GA4 Property: give it a name, timezone, and currency
- Select your industry, category, and business size
- Click Create and accept terms
- Provide website address
- Fill in details about your business and click Create
- Set up data stream for Web, and IOS/Android if you have an app
You'll then need to add Analytics to your Shopify store.
Read more: Boost Conversions with Google Analytics for Shopify Stores
How to set up GA 4 if you already have an Analytics account
For those with an existing Analytics account:
- Login to your Google Analytics account,
- Click on Admin. Make sure your desired account and property are selected.
- In the Property column, click on GA4 Setup Assistant.

- Click on Get Started to launch the setup wizard, then click Create property.

Google Analytics 4 Setup Wizard (Source: Data Driven U)
The setup wizard is a super easy feature that will get you ready for GA4 in no time. It creates a new GA4 property for your account, copies over the basic settings from your UA property, and activates enhanced measurement. There’s also an option to use the existing tags from your UA property, however, the wizard can’t migrate customized tags.
The wizard will let you know if you need to install new tags for your site. This will be the case if your UA contains custom tags, and is essential if you want to take full advantage of GA4’s new data collection capabilities. We’re going to dig into how to do this in the next section so read on!
Tracking with Google Tag Manager & Google Analytics 4
Next, you need to make sure you’re able to collect the data that’s pertinent to your store. This can be easily done with Google Tag Manager (GTM).
Google Tag Manager lets its users add tracking pixels and update tags on a website or app with ease. By using GTM, you don’t need the help of a developer to make changes to code which means you can begin collecting data. The power lies in your hands.
If you don’t already have GTM installed for your store, head over to this guide to get started.
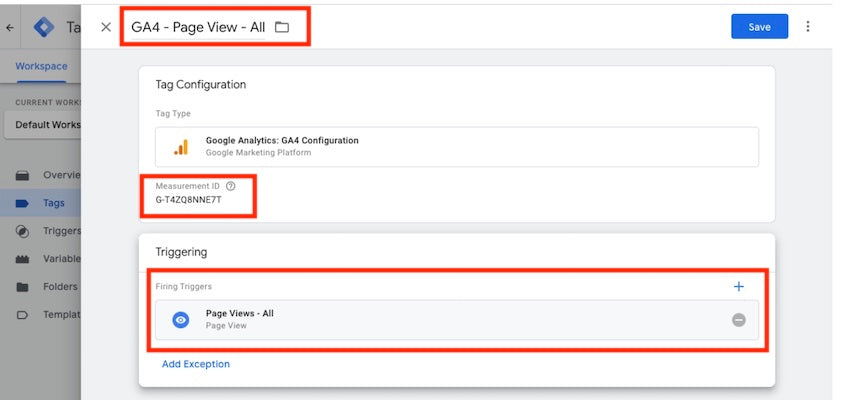
To start recording GA4 events, you’ll need to create a Google Analytics: GA4 Configuration tag and add it to all the pages on your Shopify store. In contrast to UA, this single tag sets cookies for your property, and fires automatically collected events to Google Analytics 4.
To set up your Google Analytics: GA4 Configuration tag you need to create a trigger and tag for all your page views.
How to create Google Analytics: GA4 Configuration tag
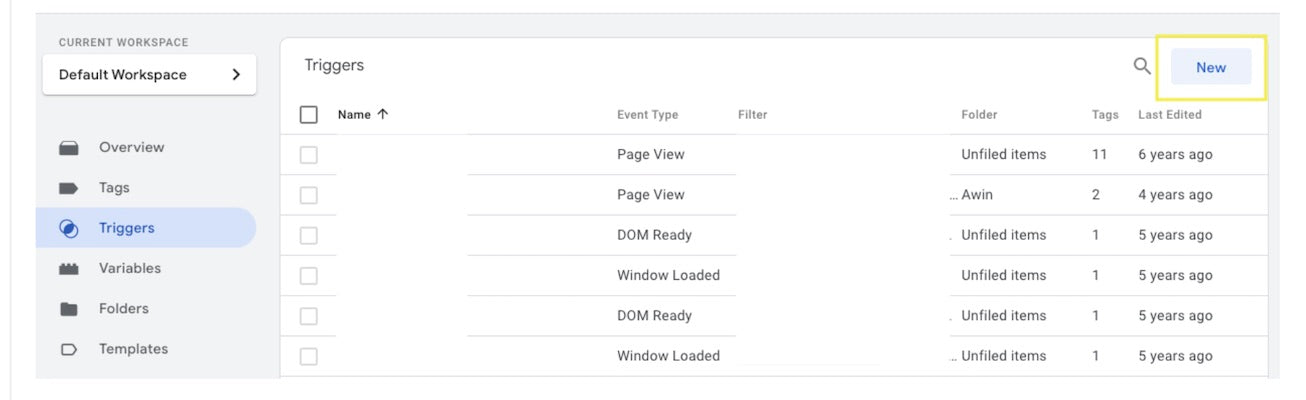
Create Page View Trigger

(Source: Search Engine Journal)
This lets the tag know when to get to work. To create it:
- In your GTM Workspace, go to Triggers > New
- Give the trigger a name, something like All Page View
- Select Page View as the trigger type, and click on the circle next to All Page Views
- Save
Before you move on to creating your tag, it’s best to first find your measurement ID. Open your GA4 property and go to Admin. Select Data streams in the property column and click on your web-based data stream. Make a note of your measurement ID.

(Source: Optimize Smart)
Create Page View Tag
(Source: Search Engine Journal)
This sends data to GA4. You create it by:
- Heading to your GTM Workspace then Tags > New > Tag configuration
- Give the tag a name like GA4-All-Page View
- Click Google Analytics: GA4 Configuration and enter your measurement ID
- Click Triggering and choose All Pages:Page view
- Save
This setup will allow you to track basic data such as page views, session start, user engagement, and video engagement. Take a look at the full list of automatically tracked data here.
You can also collect enhanced measurement events such as outbound clicks, scrolls, and site searches. This should be automatically enabled after creating your GA4 property, but you can check by going to your property, then Data Streams > Web in the property column.
That being said, do you feel like something is missing? Important eCommerce data are, unfortunately, absent when we use this method alone.
You need information on the products that are being viewed, the items being purchased, and details regarding the purchase like its value and quantity. These vital metrics can be attained by creating data layers for purchase events and product views.
How to collect purchase events
To get your hands on the deeper insights GA4 bestows, we need to feed it additional information from your store. This is where data layers come in.
A data layer acts as a hub for storing specific events and their associated data. It basically lets you pick and choose the precise information you want to collect that goes beyond the standard. By manually mapping data layers to specific event parameters, you’ll be able to collect data with the rich insights GA4 provides.
Let’s start by setting up a data layer for purchase events.
Creating a purchase data layer
A purchase data layer will capture purchase events with variables such as currency, payment type, transaction ID, order item quantity, etc.
First, you need a purchase data layer code. Search Engine Journal and Analyzify have example ones that you can copy. Make sure you edit the event name in the code to reflect the name of your store. Once you’ve got that, you’ll need to add the code to your checkout page.

(Source: Analyzify)
In Shopify Admin, go to Settings > Checkout. Scroll down to Order Status Page > Additional Scripts. You can then paste the code beneath your GTM container snippet.
Create purchase event trigger in GTM
Now, we need to set the conditions for the event to fire to GTM.
(Source: Search Engine Journal)
Go back to your GTM Workspace, find and click on Triggers. In the top-right corner there’s a button called New, click on that. Give it a name like Custom Purchase Event. Next, click on the row that contains the trigger you just created and select Custom event.
You’ll be prompted to name the custom event which needs to be identical to the event name in your data layer code.

Event name in purchase data layer code (Sources: Search Engine Journal) & Analyzify)
Assign variables
Following that, you’ll need to assign variables to the purchase data layer.
In your GTM Workspace, click Variables then select New in the User-defined variables area. You can name this whatever you like as it’s only used internally.
Under Variable type, select the Data Layer Variable option. The data layer variable name needs to be exactly the same as what is written in your purchase layer data code.
Let’s take shipping as an example. If you’ve used Search Engine Journal’s purchase layer data code, the data layer variable name will be shipping. Analyzify’s code, on the other hand, has it as shipping_price.

Names of variables in purchase data layer code (Sources: Analyzify & Search Engine Journal)
Repeat the above steps for every variable in your purchase layer data code.
Create and configure purchase tracking tag
Next, you need to create a tag for your purchase event.
In your GTM Workspace, click on Tags then select New. You’ll be asked to name it, you can name it GA4-Purchase Tracking. Click on Tag configuration, then:
- Tag type: Google Analytics GA4 Event
- Configuration Tag: your GA4 Global Tag (this can be found in your web data stream under Tagging Instructions)
- Event name: Purchase
Here comes the exciting part - it’s time to play with event parameters! This is what sets GA4 apart from all legacy Analytics, and is the key to the user-centric, holistic knowledge of your customers and their behavior.
Head over to this documentation to identify the parameters you’d like to have for purchase events. Make sure your selection of parameters includes the variables in your purchase data layer.

Some parameters you can add to your GA4 tag (Source: Google)
In the Event parameters section, hit Add Row. Copy and paste the parameter name from the documentation. Click on the “+” icon in the next column under Value, and choose the associated data layer variable you created earlier.
The Trigger is the Custom Purchase Event you made previously. Click Save and then Submit.
How to collect product view events
To collect information on the products visitors to your store are viewing, you need to create a product view data layer. You can then basically follow the exact same steps as you did for the purchase event. The only difference here is that the data layer is added to your theme file instead of your checkout page.
Create a product view data layer
Search Engine Journal and Analyzify have codes you can copy. Remember to change the event name in the code.
Go to your Shopify Admin then select Online Store > Themes > Actions > Edit code.
Navigate to the Snippets section and click on Add new snippet. Give the new snippet a name, something along the lines of GA4-GTM-product-data-layer, then click Create. Paste the product view data layer code in the box, and hit Save.
On the left-hand side, locate the file called theme.liquid. Within the file, find the first instance of /head and paste the following above it: {% render ‘GA4-GTM-product-data-layer.liquid’ %}
Save it.
Create Product Detail View Trigger
In your GTM workspace, go to Triggers > Add new > Custom Event. Name it ProductDetailView.
The Custom Event name needs to be identical to the event name in your product view data layer code.
Create variables
Just as you did for your purchase data layer, variables need to be created to reflect what is in your code.
Go to your GTM Workspace, then Variables > New, and give it a name of your choosing. Go to Variable Type and select Data Layer Variable. Ensure that the data layer variable name matches what’s in your code.
Create Product View Event Tag
In your GTM Workspace, go to Tags > New. Name your tag GA4-Product View Tracking. After it’s saved, click on it to enter the Tag configuration section, and input the following:
- Tag type: Google Analytics GA4 Event
- Configuration Tag: your GA4 Global Tag
- Event name: Product view
You can then add your parameters. Check out this section of the GA4 documentation for parameter ideas.

Some product-centric parameters you can add to your GA4 tag (Source: Google)
The trigger for this will be ProductDetailView.
How to check your GA4 settings are working
It’s fairly simple to check whether your GA4 setup is working. You have a couple of options; Realtime Report, Google Tag Assistant, and DebugView. It’s not a bad idea to use all three options. That way you’ll be extra certain that your GA4 is set up to run smoothly.
Check GA4 settings with Google Tag Assistant
Select Preview in the top-right corner of your GTM Workspace, enter your store’s URL, view some products, and make a purchase.
Navigate back to the Tag Assistant window and check that the names of your tags are populated under Summary. Click on them and take a look at the API Call information. If it contains all your variables, you’re in the clear!
Check GA4 settings with Realtime Report
Go on your website and make actions like viewing products. You can then head over to GA4, select Reports > Realtime in the left sidebar, and see if your visit is reflected on it. Click on View user snapshot to see if the actions you made appear as events.
Check GA4 settings with DebugView
In GA4, go to Configure > DebugView. Here you’ll see a stream of events. If the actions you made come up in this stream, then your GA4 setup is working just fine.
Wrapping Up
GA4 is set to give e-merchants deep insights into their customers and how they behave in their stores. If you’re willing to toy a little with code, GA4 provides the utmost flexibility when it comes to the type of data you track. With this data and knowledge at hand, the marketing and strategic planning for your Shopify store will be kicked up a notch. What’s not to love about that?